by Miriam Card
A quick and easy guide to vermiculture—the art of getting worms to take care of your kitchen compost.
 Ask any gardener, and you’ll soon be convinced of the benefits of composting. Composting in the backyard is great for yard waste, but when it comes to food and kitchen scraps, the worms take it, hands down. Vermiculture, the cultivation of composting worms, means no stinky food in the garbage, less methane emissions from landfills, a return of much-needed nutrients to the soil and thousands of little friends to help you achieve these important feats. These amazing, squirmy creatures achieve this by doing what they do best: eat and poop.
Ask any gardener, and you’ll soon be convinced of the benefits of composting. Composting in the backyard is great for yard waste, but when it comes to food and kitchen scraps, the worms take it, hands down. Vermiculture, the cultivation of composting worms, means no stinky food in the garbage, less methane emissions from landfills, a return of much-needed nutrients to the soil and thousands of little friends to help you achieve these important feats. These amazing, squirmy creatures achieve this by doing what they do best: eat and poop.
Vermicomposting is about as easy, or as difficult, as the aspiring vermiculturist wants to make it. There are certainly scientific techniques that can be employed to heighten the efficiency of one’s worm bin. But happily for those of us with other things to do, turning elsewise rubbish into prize muck can be as easy as tossing stuff in the trash. The easiest path, of course, is to simply buy a worm composting kit, which comes complete with everything necessary to start vermiculturing. But for those do-it-yourselfers, the process isn’t much more complicated.
Get it going
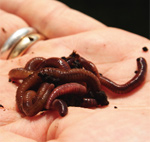
Successful vermiculture requires just four ingredients: worms, a bin, bedding and food. But not just any worms will do. You can’t just dig up nightcrawlers in the backyard; they don’t take to worm bins very well. Instead, a couple of varieties of redworms are used. Perhaps the best worm for vermiculture is Eisenia foetida, commonly called the red wriggler. Less commonly, Lumbricus rubellus, or red earthworm, is used. These worms can easily be purchased from worm breeders locally or online. In the Salt Lake area, Mr. Verlo Ottley sells worms suitable for vermiculture. See below for his contact info.
Worm bins vary widely, from homemade wooden boxes to pretentious worm condos that make vermiculture venture look like a trip to IKEA. First, consider how big a bin and how many worms you’ll need: For every pound of waste you plan to put in the bin per week, you’ll need one square foot of surface area (8-10 in. deep). So, if your household generates five pounds of waste per week, you’ll need five square feet of bin (that’s side by side, not stacked). You’ll also need twice as much worms as waste: 10 pounds of worms can handle that five pounds of waste. Don’t worry about buying that many worms; they reproduce quickly. In fact, if you have friends who raise worms, get on their “waiting list”; the time always comes when there are Too Many Worms, and for the good of all, some must go to a new home. Until then, feed your worms what they can handle, and add the remaining food scraps to your outdoor composter.
Before putting worms in the bin, prepare the bedding. Wrip newspaper into strips (you can use leaf mulch, too) and add a few spadesful of soil and/or manure. The main rule about bedding is to keep it damp; since worms must stay moist, dry bedding absorbs the moisture from the worms, spelling disaster! This is a consideration not only when preparing bedding, but also when adding scraps of food to the bins. Fruits and vegetables high in liquid content can swamp the otherwise-carefree vermin. Keep the bedding good and damp, but without lots of dripping.
Let them eat cake…or anything else
Other than worrying about liquid content, the rules for feeding worms are simple. Worms can eat pretty much anything that would go into a normal compost bin, and more. Feel free to throw in things like raw or cooked fruits and vegetables, grains and even prepared foods like pizza. Meat scraps are more difficult to break down and therefore can create some odor and pest issues, but adding a carbon source such as sawdust will make it decay more quickly as well as inhibit smells and pests.
After first introducing worms to their new homes, give them a day or two to adjust before feeding them. They’ll spend that time happily chewing on their bedding. Worms can eat nearly their own weight in food each day, but don’t just dump food on them. Feed them only a handful at a time, burying the food a little in the bedding, and try to bury food in different areas throughout the bin rather than adding continuously to one side. Some vermiculturists also add grit to the bin to help worms digest the food. Bring your favorite barista a plastic pail and pick it up, full, the next day; worms love coffee grounds!
Now comes the easy part. Sit back, relax, and let the worms do their thing. For a while, at least. Eventually, they will have turned most of the scraps into compost, or “castings,” as their fine fecal matter is called. A bin full of castings is unhealthy for worms, so they shouldn’t be left in this environment for long. It will be obvious when it is time to harvest the castings—the bin will be full of a dark, rich, crumbly soil-like substance instead of mostly bedding and food.
Reaping the rewards
To harvest the castings and retain the worms, there are two basic approaches. The first is to pick out the worms by hand, dividing them from the castings. This can be easier than it sounds, since worms abhor light and will tunnel down into the lower layers of castings to avoid it. A neat trick is to make sure there’s a lot of light (lamps or sunlight) and then dump the finished vermicompost out on a big sheet of plastic. Divide it into piles and wait for a minute to give the worms time to retreat from the light. Then scoop off the top layer of castings. Wait again and scoop again. Continue like this and, in the end, you’ll have a big clean muddle of worms. Return the worms to new digs, with a bit of the castings included to act as an activator for the fresh batch of bedding.
The second approach to harvesting vermicompost is to move the finished product, worms and all, to one side of the bin and fill the other side with fresh bedding. The worms will eventually find their own way over to the fresh stuff. The castings can then be scooped out and the new bedding more evenly distributed.
The second approach is easier; the first approach, definitely more fun.
Sprinkle the finished vermicompost around the base of established plants or add to planting holes. Vermicompost is great for seedlings, too, as it doesn’t burn plants like chemical fertilizers can.
Keep your worm bins close to the kitchen if possible, so it’s easy to add food scraps. Remember that worms need to be kept at about room temperature at all times. Do not keep your bin outdoors, or you will regret it. And to keep worm friends happy, leave the lid closed at all times except when adding grub.
Welcome to the world of worm-iculture!
Miriam Card is CATALYST’s summer intern from the University of Utah’s Department of Environmental Studies. The CATALYST staff keeps worms in the office basement; they offered firsthand advice for this article.
Resources:
Earthgoods General Store:
1249 South 900 East, Salt Lake City
801-746-4410; www.earthgoods.net
Verlo Ottley (worm breeder):
4300 South 2200 West, Salt Lake City
801-968-5483
Wasatch Community Gardens:
801-359-2658
www.wasatchgardens.org/gardenresources.html
DIY wooden vermiculture bin: whatcom.wsu.edu/ag/compost/wormbins.htm
“Composting: An Easy Household Guide” by Nicky Scott
“Worms Eat My Garbage” by Mary Appelhof
www.wormfarm.com
www.windsweptwormfarm.com
www.worms.vinfo-help.com